How to Style a Wig
Now that you have decided to purchase a wig, you'll need to figure out how to keep your wig looking at its best to compliment your look. While some people opt to wear wigs just as they come out of the package, others are more willing to being creative and customize their wigs to show their flair and attitude by adding fun details to the style. Either way, you will need specific styling products to obtain a natural look and maintain the beauty of the hair.
Of course, unpacking your wig can come with a lot of stress. Even if you saw the wig in person before you purchased it, seeing it on your head for the first time can be jarring. Keep in mind most wigs need manipulation to create a natural look, which can vary from plucking to cutting, coloring, and styling.
Not All Wigs Are Created Equally (Creating your perfect style)
When purchasing a wig, it is worth noting some wigs are made with synthetic hair. Often, these wigs are inexpensive but cannot be altered to create a natural look. The most you can do to manipulate these wigs is to fluff the curls, accessorize or cut the wig to fit the shape of your face. You cannot use any heated styling tools on this wig.
If you are planning to wear your wig for a longer period, it is best to buy 100% human hair wigs. Human hair wigs, can help you to give more flexibility to your styling and meeting the client needs like curled, straightened, or dyed etc.
Where to Start When Styling a Wig
While the internet can provide a wide range of information on how to style a human hair wig, the most important place to start is with the proper tools and products. You will need:
- A wide-tooth comb
- A paddle brushes
- Sulfate-free shampoo
- Tweezers
- Small fabric scissors
- Hair-cutting scissors
- A curling iron or wand
- Foundation (makeup) or Lace Tint
While using these items, it is essential to be gentle when styling, it is crucial to remember the method used to create the wig. Strands of hair are looped through the lace to create a realistic look. Mistreating the wig can pull the hair from the wig and create bald spots.
Step one of creating the perfect hairdo is washing your wig. Whether you wear a 100% human hair wig every day or only on certain occasions, keeping it clean is important. Wig washing is essential if you want it to last you a long time. When considering how to style a wig, it is important that you use sulfate-free shampoo or shampoo specifically made for human hair wigs to help prolong its lifespan and to minimize wear and tear.
Step two of nailing the perfect hairdo is detangling the wig with a wide-tooth comb or paddle brush. Start at the ends of the hair and work your way up to the crown of the wig, making sure each section is knot-free. A steady hand is a crucial part of this step to avoid pulling out strands of hair.
Do’s
- Always use gentle products on human hair wigs.
- Use cold or lukewarm water for washing and rinsing.
- Keep human hair wigs on stands while blow-drying them.
- Use the gentlest and coolest settings on a hairdryer to blow dry human hair wigs.
Don’ts
- Never style a human hair wig while wet. This can damage the construction of the wig and reduce its durability. Since you are using a human hair wig, you have the option of using a blow dryer to minimize drying time. Just make sure the hairdryer is set to medium or low heat to prevent heat damage.
- Never use hot water when washing human hair wigs. Hot water can damage hair. Hair cannot grow back; once it is damaged, nothing can be done to fix it.
- Resist the urge to rub shampoo directly into the hair or cap of your human hair wig. Doing so can cause soap to become lodged into the cap and hair. It can also damage the human hair wig.
- Don’t rub your human hair wig roughly with a towel to dry it. Either let it dry naturally on the stand or use a hairdryer.
- Never place a badly tangled human hair wig directly into the water. Always work out tangles and snarls before washing a human hair wig. Water can make tangles worse.
The best blow-drying techniques include:
- Section off hair into two layers – Clip the layer at the top of the wig and secure it to the crown, leaving the bottom layer exposed.
- Begin drying the bottom layer – Point the nozzle of the blow dryer downward while using the brush to hold the hair taut.
- Unclip the top layer and combine it into the bottom layer.
- Blow-dry the top layer using the same technique used for the bottom layer.
Using a brush to help guide the hair downward will help smooth hair and create shine.
Once the wig is dry, it is time to adjust and style it to your liking.
Get the Perfect Part
After your wig is clean and groomed, it's time to work on how to style a wig to look natural. Your margin of error for getting an unnatural look is millimeters wide.
When discussing parts, it is best to differentiate between lace-front wigs and 360-lace wigs. There is a difference in how you can manipulate the parts and lace.
A 360-lace frontal wig will allow you to part or section the perimeter of your frontal and achieve ponytail styles. While full-lace wigs can be styled into updos and can even be used to create braids, plaits, and cornrows. Full-lace, or 360 wigs, give you more versatility in styling options. Lace-front wigs, on the other hand, allow you to create a part only where the lace is attached to the base of the wig. Typically, you can manipulate the front sections of the wig for parting purposes. Hence the name lace front.
How to Part a Lace-Front Wig
Let's start with how to style a lace-front wig.
Lace front wigs will allow you to manipulate the hair only in the front of the wig. This means you can create a part anywhere along the front of the wig where the lace is sewn onto the structure. It’s good to start your styling by deciding where you would like to section the wig to create a natural-looking part.
A key factor to consider before you cut the wig is how you plan to install it. Will you use glue or other methods to install the wig, and what looks best with your natural hairline? You may opt to purchase a ready-to-wear-wig. These wigs will require less work to create a natural look out of the packaging.
Some wigs will require you to apply makeup foundation to the lace to best mimic your scalp and may require you to pluck hair to create a part that appears natural. Not all parts are the same. When you naturally part your hair, think about the width of your part and the density of hair along the part. You will also need to adjust the lace that will follow your hairline along the front of the wig.
Place the wig on your head and adjust it, outline where you would like to cut the lace from the front of the wig with an eyeliner pencil, and remove the extra lace with a small pair of scissors you can easily maneuver. Remember that you can always cut more off, but you cannot add it back once you remove it.
How to Part a Full Lace Wig
Full Lace Wigs offer more variety in styling. Because these wigs are made by looping hair onto lace to create the entire wig, you can part the wig anywhere you want, and you can even rock cornrows and updos with these wigs. They are most often made with human hair and can be dyed, curled, or straightened to meet your styling needs.
Lace-front wigs, full-lace or 360-lace wigs will all require you to trim the lace around the edge of the wig and manipulate the part you wish to create. Since full-lace wigs come in different levels of hair density, meaning some wigs are fuller than others, you may need to adjust the width of the part by plucking some hairs. You can then color the part with foundation to best match your scalp.
Keep in mind we are talking about millimeters of width to manipulate. Slow and steady is best when adjusting your parts. Take your time when plucking hair, and remember it is very important that you make these adjustments while you are wearing the wig. Do not attempt to do this on the wig stand. It will result in uneven and dis-satisfactory results.
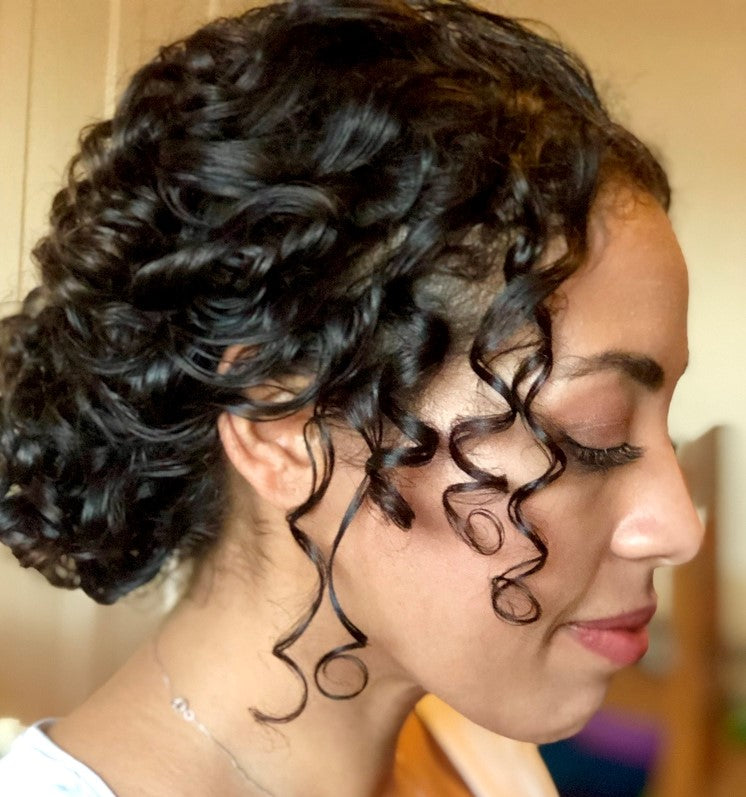
How to Curl a Wig
Remember that human hair wig can be cut and curled with curling wands or irons, but just like your natural hair, excessive heat can damage human hair wigs. Often, wigs will come with instructions on the temperature of heat the hair can withstand. It is best to follow those guidelines, but a good rule of thumb is to keep the temperature of your curling iron between 200 and 300 degrees.
Once you have the curls, you want to be cautious of certain styling products. While hair spray can be used to hold the style in your human hair wig, be cautious of overusing products on your wig. A buildup of products will lead to the wig becoming weighed down and requiring more frequent washing, which causes the hair to break down quickly. Hair spray should never be used on a synthetic wig.
There are many different looks you can go for when curling your wig, whichever style you want is up to you. Here’s a technique for getting loose waves:
- Section hair into four equal parts.
- Start with one of the front sections and divide that into four parts so that each of the smaller sections is the diameter of a quarter.
- Take one of the smaller sections and wrap it around the barrel of the curling iron away from the face.
- Hold the hair against the curling iron anywhere from 5-7 seconds.
- Remove the curling iron and hold the curl in your hand, allowing it to cool down before letting it drop.
- Repeat steps 3-6 for the rest of the hair on the wig.
- Brush out curls by running your fingers through the hair to create a loose wave.
Style Your Wig Your Way
The hard part is over, so now's the time to have fun. When it comes to styling a wig, there are endless ways to style a wig and you have the freedom to practice all kinds of looks. Whatever wig style you choose, wearing it with confidence is the key to pull off any look. IM Beauty Wigs are 100% human hair that allow diversity for any style, shop with us today!


